The QuickLift® and Lateral Subcutaneous Browlifting From Simplified Facial Rejuvenation
Published by Springer-Verlag Berlin Heidelberg 2008; Chapter 48; Page 371, 2008
Introduction | Technique | Marking | Surgery | Complications | Discussion | Conclusions | References
Introduction
 In June of 2004, the author introduced a modification of the S-lift of Saylan1 called the QuickLift™.2 The original procedure differed from the S-lift in that the incision was radically different and customized, the undermining was more aggressive in the neck and temporal regions, the advancement vector was much steeper, and one large 0-shaped purse-string was utilized for subcutaneous muscular aponeurotic system (SMAS) and platysmal tightening instead of a U-shaped and 0-shaped purse-string (Fig. 1). These changes created better cosmetic results in the neck, jowl, and mid-face regions, which allowed the purse-string plication concept to move into the realm of treating individuals with more significant aesthetic problems (i.e., older patients).
Recently, the author revised the QuickLift™ with an encircling double purse-string plication technique (Fig. 2) that has been found to create better improvement of the mid-face and periorbital region; eliminate bulging of subcutaneous and SMAS tissue; provide stronger SMAS and platysmal support; and create a back-up support in case one of the purse-strings pulls through.3 This article also recommended liposuction of the neck and/or jowl with a 3 mm Coleman cannula combined with a submental tuck (Fig. 3). At the time of this writing the one year results have been extremely gratifying (Fig. 4, 5) with patient satisfaction being very high. In short, the QuickLift™ offers the advantage of being able to be performed in one to two hours with local anesthesia, while creating significant long-term improvements in the neck, jowl, mid-face and periorbital regions, with minimal morbidity and complication.
Although the QuickLift™ does give significant facial and neck improvement it does not address the degeneration of the brow, bone, fat and muscle that occurs with age. Ptosis of the lateral brow is especially one characteristic that creates an unattractive look as one ages. In the young patient it has been stated that the distance between the eyebrow and the midpupil should be approximately 2.5 cm.4 But as we all age this distance diminishes and starts to create the illusion that there is an excessive amount of skin on the upper eyelids. In fact, patients with sagging lateral brows usually mention excessive eyelid skin as their primary complaint, when in essence it is a ptotic lateral brow that is causing the problem.
This lateral forehead region is unique because it is the only area on the forehead that is void of musculature (Fig. 6) unlike the medial aspect that is covered extensively by the frontalis muscle. This muscle is important in the context of facial aging because its contractile state helps keep the medial brow elevated in a more youthful position as one ages. Conversely, the lateral brow region has minimal musculature to help keep it in an elevated state. It is therefore more subject to skin photodamage and intrinsic skin aging. Because of these facts, the lateral brow is the first area to show the affects of aging and as this degenerative process continues, the lateral region usually sags more intensely than the medial aspect.
Because aging in the lateral forehead region is primarily a cutaneous problem, the author thinks that addressing skin only is the best and safest way to manipulate this area. This chapter describes a modification of previously reported subcutaneous browlifts5-7 that can easily be added to the QuickLift™ procedure, without significantly increasing operative time or post-operative morbidity and complication.
Technique
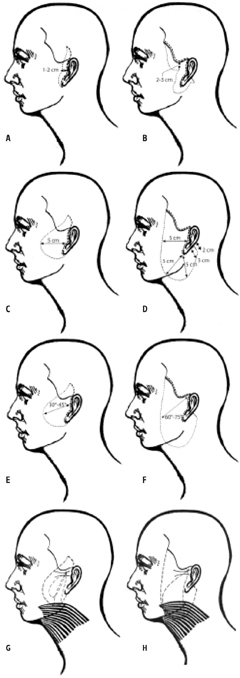
Figure 1: A) The S-lift incision is shaped like a lazy S and is extended into the temporal hair. Usually 1-2 cm of skin is removed at a 30° 45° angle. B) The QuickLift™ incision extends 3 mm behind the temporal hairline to the most anterior aspect of the temporal peak. It also extends 4 cm along the posterior crease of the earlobe and has a hockey stick that follows Langer’s lines. This incision is customized to the individual and allows for a 60-75° angle of advancement with 2-3 cm of skin removal throughout. C) The S-lift undermining is 5 cm anterior to the incision with little to no undermining inferior to the earlobe. D) The QuickLift™ undermining is 5 cm anterior to the tragus in the horizontal axis, 5 cm anterior to the earlobe (along the angle of the mandible) 5 cm inferior to the bottom of the earlobe, and 1.5-2.5 cm below the hockey stick in the postauricular region. In the temporal region the undermining is usually 2.5 cm from the inferior aspect of the temporal hairline. E) Because of the shape of the S-lift incision, the surgeon is primarily limited to a 30°45° angle of flap advancement. This fact limits the effect that can be accomplished at the cervical region. F) The QuickLift™ incision allows for a 60°-75° angle of flap advancement, which creates significant improvement in the neck region without aggressive undermining. This more superior advancement also prevents a pulled back appearance and counters the normal gravitational downward pull of aging. The S-lift purse-string plication consists of a deep 2-0 braided nylon anchor suture at the zygoma with a U-shaped and Oshaped purse-string applied to the SMAS and superior aspects of the platysma to create tightening of the sub anatomy. H) The original QuickLift™ purse-string consisted of one anchored large O-shaped purse-string that followed the area of undermining. There is a much greater degree of platysmal tightening and neck improvement with this approach.
At the consultation the consent forms are reviewed and the patient takes them home for further study. The night before the procedure the patient washes his/her hair and face with povidine shampoo and takes 1 mg of lorazepam before bedtime. In the morning the patient again washes the scalp and face with povidine shampoo and reports to the surgical facility. At the clinic the consent forms are again reviewed, questions answered, and the forms are signed. Diazepam 10 mg is then administered orally, and a combination of 2.5 mg of midazolam and 50 mg of meperidine hydrochloride is given intramuscularly.
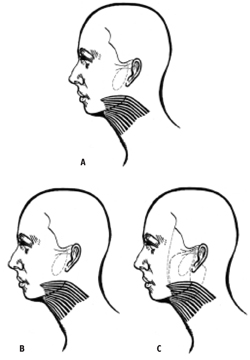
Figure 2: A) The newer encircling doublepurse-string plication technique involvesfirst performing a 2-0 braided nylonanchor suture 1.5 cm away from the skinedge (indicated in green). This anchorsuture is directly over the zygomatic arch,passes all the way to the bone and is 1.5cm in length. Three to four more 1.5 cmsuperficial grasps of SMAS are takentoward the bottom of the jowl, one 1.5 cmgrasp is made perpendicular and medial tothe latter, then five 1.5 cm grasps ofSMAS are made toward the anchorsuture. Five throws of the suture are madeand a 2 mm suture end is left. B) The sec-ond 1.5 cm anchor suture (indicated byred) starts 3 mm superior and 3mm later-al to the first anchor suture’s knot. Four tofive 1.5 cm long grasps of SMAS are madein a directly inferior direction. The nextfour 1.5 cm long grasps will be of platys-ma and should follow directly behind theedge of skin undermining. C) The secondpurse-string differs from the originalQuickLift™ purse-string in that the 1.5cm SMAS grasps are continued moresuperiorly to affect the mid-face (indicat-ed by blue). Once the surgeon has reachedthe same height as the superior aspect ofthe second anchor suture superficialgrasps are made directly toward the sec-ond anchor suture. The last grasp of tissuebefore hitting the second anchor suturewill be the third anchor suture and shouldbe 3 mm deep (indicated by orange). Thesecond and third anchor sutures will thuscreate a V-shaped anchoring point for theplatysma, jowl and mid-face.
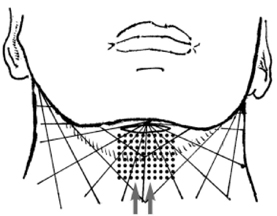
Figure 3: The revised QuickLift™ involves
liposuction of the neck and/or jowl with a
3 mm Coleman cannula combined with a
submental tuck.
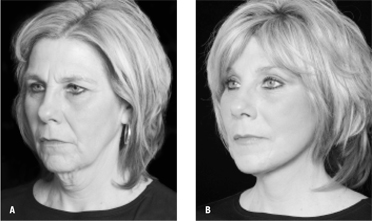 |
| Figure 4: A) A patient before the QuickLift™ with the encircling double purse-string plication technique. B) Twelve months after the procedure. |
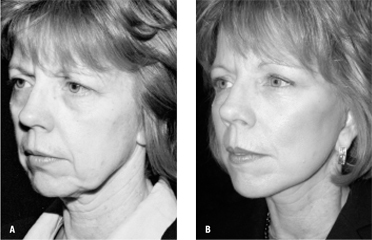 |
| Figure 5: A) A patient before the QuickLift™ with the encircling double purse-string plication technique. B) Fifteen months after the procedure. |
Marking
The scribing for the proposed incision line is then begun with a Pilot Marker®. This marker is utilized because it has been found to contain ink that gets the surgeon through the surgery without major portions of the markings being removed. The author utilizes a surgical technique that places the incision on the tragus (not posterior or anterior); therefore the scribing is begun on the tragus. From that point, the anatomy of the ear is followed so that a straight line is not drawn in the preauricular region (Fig. 7). If one looks at Figure 6, the marking moves in and out of the ear anatomy to create a meandering incision line. This wavering line makes the visibility of the postoperative scar very difficult to perceive.
In the area behind the ear, the marking is brought 2 mm above the earlobe crease for a distance of 4 cm and a hockeystick is drawn to project from that crease line in one of Langer’s lines (Fig. 7). This hockey-stick is usually 2.0 cm in length, but can be shorter or longer depending upon the amount of excess posterior neck skin available for Burrow’s triangle excision during the procedure.
From the top of the preauricular line (superior attachment of the ear), the line proceeds 3 mm behind the anterior edge of the temporal hairline all the way to the end of the temporal peak. It is critical that magnifying loupes be used at this point so that the temporal line is marked exactly 3 mm behind the anterior edge of any existing hair follicles. This distance has been chosen because it will normally contain enough hair follicles to make a 45° bevel technique effective at camouflaging the scar at a later time (Fig. 8). If a 45° bevel is begun 3 mm behind the anterior edge of the temporal hairline and a similar bevel is performed on opposite side, a significant number of hairs will be trapped beneath and anterior to the incision line upon closure (Fig. 8). Normally, these trapped hairs will go into anagen effluvium for 3 months owing to surgical trauma, but after this period of time, the follicles will start growing through and anterior to the scar (Fig. 8). Once the temporal hairline aspect of incision has been marked, the lateral forehead incision is scribed. At this point the author has the patient raise his/her forehead at which time the lateral forehead wrinkles are discerned. A line that follows Langer’s lines (Fig. 7) is then drawn in red ink along one of the lateral forehead wrinkles (Fig. 9). This line can be easily extended from the temporal hairline incision. This red line is extended as far medially as needed to create the amount of elevation that is desired, but is always lateral to the supraorbital nerve and vessels. If one brow is slightly lower than the opposite brow, it is not uncommon to extend the incision above the lower brow slightly more medial. If both brows need to be raised equally, a point is drawn at the midline of the forehead, and it is made certain that the distance from the midline to the end of each forehead incision marking is equal.
After the red lines are completed, the Pilot Marker® is used to draw a line above the red line in accordance with amount of skin the surgeon judges to be removed above the given eyebrow. For example, if the surgeon predicts that 2 cm of skin will be removed at the lateral forehead, the Pilot Marker® blue line will be drawn in a fusiform shape 1 cm above the red line (Fig. 9). Conversely, if only 1 cm was predicted to be removed, the blue line is drawn 5 mm above the red line. This is done so that after the fusiform excision of excess lateral forehead skin, the incision line is exactly in the position of the former wrinkle.
The area of undermining is now scribed with a Bonnie Blue ink. A vertical line is drawn from the end of the red line to a point that is 1 cm below the inferior aspect of the brow (Fig. 9). The QuickLift™ undermining points are then drawn 5 cm anterior to the tragus incision line, 5 cm anterior to the earlobe along the angle of the mandible, and 5 cm inferior to the earlobe. These anterior points are connected with the Bonnie Blue ink and are then extended to meet the vertical line underneath the brow (Fig. 9). The point 5 cm below the earlobe is then connected to the end of the hockey-stick behind the ear.
If the patient is concerned about a scar in a forehead rhytid, one can extend the incision into the anterior hairline using the bevel technique (Fig. 9). Also, if the patient is concerned about a scar in a forehead rhytid and has a minimal brow ptosis problem, one can extend normal undermining to the lateral brow from the normal QuickLift™ incision (Fig. 9), so that a mild superior lateral elevation is achieved.
Surgery
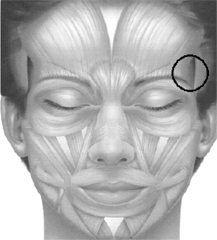
Figure 6: The lateral forehead region has minimal musculature (indicated by the circle), which makes the lateral brow more prone to ptosis because there is no musculature to keep it in an elevated state. The lateral brow is thus very prone to sag secondary to skin photodamage and intrinsic dermal aging. Conversely, the medial forehead has the frontalis muscle, which keeps the brows fairly elevated throughout life because of its contractile state.
The patient is brought into the operating room at which time the face is prepped with povidine solution. The area to be undermined is infilitrated with 0.2 % lidocaine hydrochloride with 1:200,000 epinephrine utilizing a 21 gauge spinal needle and making certain to stay in the subcutaneous space. It is also important to push the solution slowly because it is often the rapid speed of injection that causes most of the discomfort. Once the subcutaneous space is injected it is important to inject along the incision lines and into the earlobe since hooks will be used to manipulate the earlobe during much of the procedure.
The incision is begun at the most medial aspect of the right forehead marking. At the onset, the #15 blade is held with an inward 45° bevel so that maximal eversion will be accomplished at the forehead wrinkle at the time of closure. However, when the temporal hairline is reached, it is critical to change the bevel to a 45° angle in the opposite direction, so that the hair follicles anterior to the incision will be preserved (Fig. 8). This latter bevel continues up to the superior aspect of the attachment of the pinna. At this point, the bevel is changed in the opposite direction throughout the remainder of the incision (anterior to the ear, inferior and posterior to the earlobe). Once again, this is done to create maximal eversion upon closure, which will improve the cosmetics of the scar.
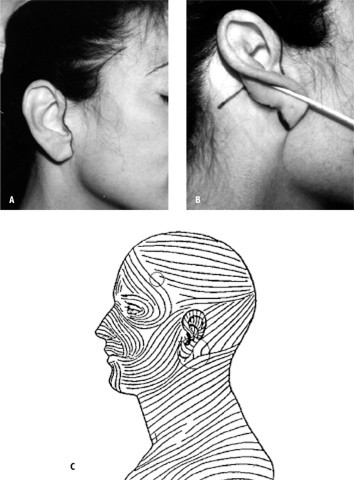
Figure 7: A) The markings are begun on the tragus and extend along the front the ear and 3 mm behind the temporal hair- line. Notice how the line meanders along the anatomy of the ear. This creates a much less detectable scar. B) The line is extended 2 mm above the posterior ear- lobe crease and is 4 cm in length. The hockey stick is usually 1.5 cm to 2.5 cm in length but will vary in size depending upon the amount of excessive posterior neck skin available for Burrow’s triangle excision during the procedure. This line should be made in Langer’s lines so that healing is optimal. C) The hockey-stick and forehead incision usually heal extremely well because they follow Langer’s lines.
Undermining is begun with a #15 blade in the V-shaped area at the superior aspect of the ear and is continued for 1 cm down to the anterior aspect of the earlobe. Once this is accomplished, the superior V-shaped aspect of this newly created flap is grasped with a Lahey clamp and pulled away from the temporal forehead region and toward the surgeon. As this vector of tension is created with the Lahey clamp, undermining is performed with a facelift scissor in the area immediately above the zygoma and will continue toward the most medial aspect of the forehead incision. The assistant spreads with his/her fingers on the lateral forehead skin and pulls the lower brow away from the surgeon with the thumbs. This tension helps keep the skin turgid so that accurate underming can be performed in the forehead region. The forehead undermining is performed with the tips of the facelift scissors pointing upward to avoid the temporal branch of the facial nerve. Tunnels are made 1 cm apart and the 1 cm bridges are then cut with a facelift scissor with the points faced upward. It is important to undermine 1 cm below the inferior aspect of the lateral brow so that the scarring mechanisms will keep the brow in its new position.
Once the forehead undermining is completed, the remainder of the facial undermining is performed similarly with a facelift scissor; with the scissor tips primarily faced downward. The most critical aspect of the remaining undermining is to make certain that the flap is thick at the predicted site where the V-shaped advanced flap opposes the scalp at the superior attachment of the pinna. It is not unusual for the author to actually draw this area preoperatively. This region is most susceptible to necrosis and should be as thick as possible.
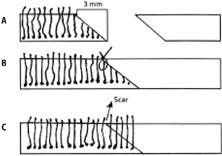
Figure 8: A) A 45° beveled incision is made 3 mm behind the anterior edge of the temporal hairline. This bevel will trap many hair follicles beneath the scar and the area anterior to it. The opposite side should also be beveled in the same direction when the excess skin is removed during the procedure. B) When the skin edges are approximated, notice how the hair matrices are trapped below and anterior to the sutured incision. It is imperative that these incisions be closed with 2.5X-3.5X magnification under minimal tension for this technique to work well. C) In 3 months (after anagen effluvium is completed) hair will start growing through and anterior to the scar line.
Undermining in the area below and behind the earlobe is performed with the scissor tips primarily pointed upward. This scissor tip position helps undermining go more quickly and prevents injury to the greater auricular nerve. Upon completion of all of the aforementioned undermining, thorough hemostasis is accomplished throughout.
At this point in the procedure, the encircling double pursestring SMAS plication is performed (Fig. 2). But before this aspect is completed, the author injects a combination of 1% lidocaine hydrochloride and ?% bupivocaine into the site of the anchor sutures. These injections are performed with a one inch 30 gauge needle and are extended all the way down to the zygomatic arch 1.5 cm away from the skin edge of the tragus. The initial 2.0 braided nylon anchoring suture is placed 1.5 cm away from the skin edge, directly over the zygomatic arch (indicated by green in Fig. 2). The suture needle should go down to bone and should grasp a 1.5 cm length of tissue. Three 1.5 cm long, more superficial grasps, of the SMAS are then taken toward the inferior aspect of the jowl. One 1.5 cm grasp is made perpendicular to the latter suture and subsequently five 1.5 cm grasps are taken back to the original anchor point. Five throws are made to create a firm knot and a 2 mm tag is left in place (Fig. 2).
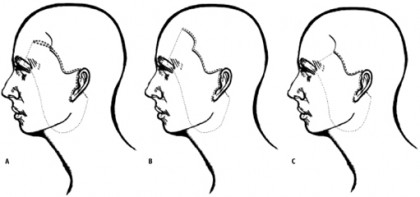
Figure 9: A) The patient is asked to raise his/her forehead and a lateral forehead rhytid is chosen for the lateral forehead extension ofthe QuickLift™. This wrinkle is drawn in red. After the amount of forehead skin excision is predicted, another blue line is drawn abovethe red line so that the final incision, after fusiform excision, will end up exactly at this red wrinkle line. The undermining should be 1cm below the inferior border of the brow, 5 cm anterior to the tragus parallel to the floor, 5 cm anterior to the earlobe along themandible, 5 cm directly inferior to the earlobe and 1.5 to 2.5 cm away from the earlobe crease. B) If the patient is concerned about ascar in the forehead crease, the incision can be brought up along the anterior hairline. C) If the patient is concerned about a scar in theforehead and has a minimal lateral brow ptosis, one can undermine over from the conventional QuickLift™ incision and slightly raisethe lateral brow.
The second anchoring 2-0 braided nylon stitch is now performed (noted by red in figure 2b). The needle enters 3 mm above and 3 mm medial to the knot of the first purse-string. This anchor suture is deep over the zygoma similar to the first anchor suture. Four to five 1.5 cm long grasps of superficial muscular aponeurotic system (SMAS) are taken in a directly inferior direction (Fig. 2). The remainder of the 1.5 cm long grasps follow the outer edge of the undermined zone toward the perioribital region. The first four grasps along the line of undermining will tighten platysma with the remaining grasps tightening SMAS.
When the second purse-string arrives at the same height as its origin anchor suture (noted in blue), 1.5 cm grasps of SMAS are made toward this higher anchor suture (3 mm above the first anchor suture). The last grasp, before meeting the second anchor suture, should be a third anchor suture creating a V-shaped double anchoring point for the larger second purse-string suture (noted by orange in figure 2c). This third anchor suture is not as deep as the first two but should at least be 3 mm deep. Once gain, five throws of the suture are made and a 2 mm suture end is left.
Once the encircling double purse-string is completed, thorough hemostasis is accomplished and the excess skin is excised. The step during the skin removal is to grab the V-shaped area at the superior insertion of the ear with a Lahey clamp and mildly pull in a superior direction. The author looks underneath the skin and marks where the line of excision will be. An inwardly beveled incision is then made at this marking and the skin edges are temporarily stapled together. The author then applies a D’Assumpaceo clamp to the scalp and superior forehead edge and sees how much advancement should be performed at the forehead region. Marks are made with the D’Assumpaceo clamp and the author makes a line connecting the indentations made by the clamp. An incision is then made at the forehead line with a 45° inward bevel for eversion and this bevel is continued throughout the temporal hair (Fig. 8). These skin edges are then temporarily stapled together.
The remainder of the facelift is done by advancing small segments, looking underneath to evaluate advancement, drawing the appropriate lines, excising, and stapling. At the region behind the earlobe the skin is advanced as firmly as possible, then a Burrow’s triangle is created to removed this excess skin. The length of the hockey stick will depend on the amount of skin that is removed (the more skin removed the longer the hockey stick).
After all areas are stapled in their appropriate positions, the staples are removed one by one and are replaced by deep 5-0 PDS sutures. The lateral forehead sutures are the most important in this procedure. The initial three deep sutures (Fig. 10) are tacked down to the periosteum. The remaining deep sutures from the temporal hairline to the superior attachment of the ear are tacked down to the temporalis fascia (Fig. 10). These tacking sutures are critical for stabilization and anchoring of the superior forehead and scalp. Once these are completed, the 5-0 PDS sutures are inserted throughout the length of the remaining incision. After all deep sutures are placed, the skin is sutured with a running 6-0 fast absorbing gut under 2.5X magnification. A mild pressure dressing is applied and the patient is seen the next day. At one week, the patient can apply water-based makeup to all incision sites.
If a patient desires a lateral subcutaneous browlift with no QuickLift™, the incision should begin at the superior aspect of the pinna and should extend either into a forehead rhytid, anterior hairline or the most anterior aspect of the temporal peak (Fig. 11).
The technique was retrospectively analyzed by photography and satisfaction levels of 28 patients over an 18 month period. Overall, the satisfaction rate was extremely high, short and long term.
Complications
All patients who had a cutaneous browlift with the QuickLift™ experienced some upper eyelid ecchymoses in the immediate post-operative period, but this usually resolved within two weeks. There was one case of a small necrosis (<1 cm2) that was near the
incision line at the temporal hairline and healed spontaneously without any corrective action being required. When the QuickLift™ was performed without the browlift (n = 812), there was a 1.0% incidence of necrosis (>1cm2) at the preauricular area. When liposuction and submental tuck were added to the procedure, the incidence was 3.5%. There were four cases of cellulitis that resolved quickly with antibiotics and one temporary buccal nerve paresis. All patients had areas of temporary anesthesia that resolved in approximately three months. The incidence of hematoma that needed evacuation was 0.5% (n=4). Because the results have been so good, the author now performs this lateral cutaneous browlift on approximately 5% of his QuickLift™ patients. The results have been especially gratifying to the patients and to the author.
Discussion
Browlifts are primarily classified according to the plane of dissection and the way of entering the given plane of dissection. The three primary planes of dissection are:
- Subperiosteal
- Subgaleal
- Subcutaneous
The five primary locations for entering the plane of dissection are:
- Behind the hairline (bicoronal, temporal or endoscopic)
- Hairline incision
- Mid forehead
- Supra-brow
- Upper eyelid (browpexy)
Friedland et. al.,8 preferred to categorize browlifts into four generations: the first is limited to direct skin excisions without extensive undermining; the second is a bicoronal approach with subgaleal separation and musculature modification; the third is extensive subperiosteal dissection; and the fourth is the endoscopic approach with various planes of dissection.
In most recent years, the main goal of cosmetic surgeons had been to limit the long scar of the bicoronal and hairline approaches. Thus the endoscopic approach has had significant emphasis during the past 20 years. This technique requires only three to five different short scars, but also requires expensive endoscopic equipment with intensive training. Many different planes for dissection can be utilized and various ways for anchoring the soft tissue to the scalp and skull have been widely discussed in the literature.9-13 All of this expense and training toward limiting the scar length, however, can lead to unsatisfied patients due to early recurrence of brow ptosis secondary to limited exposure, inadequate shrinkage of the scalp, or failure of the anchoring system.
Connell14 made the anterior hairline incision popular, but his plane of dissection was subgaleal. His claim was that the hairline incision prevented the danger of causing alopecia. Beveling the incision at a 45° angle spares hair follicles and causes hair follicles buried underneath the incision to start growing through the scar three months after the procedure (Fig. 8).
Ullmann and Levy5,7 further emphasized the anterior hairline approach, but they performed their dissection in a subcutaneous plane. They felt that the subcutaneous approach offered better results with the added benefit of the prevention of persistent scalp
anesthesia and paresthesia commonly recorded after the subgaleal approach.6 According to Ullmann and Levy the most important advantage of undermining in the subcutaneous plane is that it prevents the most frightening complication of all – facial temporal nerve injury.
The author’s approach incorporates both the beveled hairline approach with the mid-forehead approach by extending the beveled temporal incision in one of the lateral forehead wrinkles. As previously alluded to cutaneous intrinsic and photoaging is the primary cause of lateral forehead aging. It is the author contention that the periosteum and galea are not significant aspects to lateral forehead aging. It therefore makes little sense to put the patient at increase risk and make the procedure more difficult, if
the main component of lateral forehead aging is skin, not periosteum or galea.
One question that the author has received from observers of this technique is “Why can’t the incision be made to extend along the temporal hairline into the frontal hairline instead of being brought into a lateral forehead wrinkle?” That approach can be
utilized and is the approach that has been utilized by other surgeons (Fig. 9).5-7 In fact, if the patient has concerns about the forehead scar, the hairline approach is utililized. Also, if the ptosis is minimal, the undermining to the lateral brow can be reached
from the normal QuickLift™ incision (Fig. 9). It is the opinion of the author that the closer one is to the area that he/she is trying to affect, the better result that will be accomplished. For example, if one were performing a medial thigh lift, the results nearer to the incision line would be much better than the areas closer to the knee. Likewise, during a browlift, the closer the incision is to the brows, the better and more permanent the uplift.
The forehead scar should not be a problem if one uses an effective eversion technique; makes certain that the incision is directly in a wrinkle line and uses at least 2.5X magnification for closure. The scars should be barely perceptible with the naked eye at a 3-month period from the time of the procedure if the precautions are taken. Therefore the risk:benefit ratio is much in favor of the benefit. Also, patients can start applying make-up over the incision at one week. At four weeks, dermabrasion or laser resurfacing can be performed if it is felt necessary. Additionally, the forehead incision is rarely used on patients under 50 years of age because scar formation is well known to be more intense in patients younger than 50.
Looking at the longevity of the procedure, it appears that this approach gives as good of a lasting effect as any browlifting procedure to date. The mechanism for this is that the brow is totally detached 1 cm below its inferior border, is elevated into a new
position with the scarring mechanisms holding the brow in this new position. The tacking sutures in the periosteum and temporalis fascia are also very important because they keep the skin from drifting inferiorly in the immediate post-operative period. After a month or two, fibrosis will take over to keep the brow in its newly elevated position.
If the patient desires a lateral subcutaneous browlift without the QuickLift™, the incision would begin at the superior aspect of the pinna and extend superiorly either into the forehead rhytid, the anterior hairline, or anterior aspect of the temporal peak (Fig.
11). When brow lifting is not performed, results have also been extremely good and long lasting). The author feels strongly that neck liposuction with a submental tuck add longevity to the procedure through anterior-posterior skin removal and increased
fibrosis.
Conclusions
The technique describes a lateral cutaneous browlift that is extended into a lateral forehead wrinkle from the QuickLift™ incision. The browlift can also be performed from the QuickLift™ incision without an extension (mild ptosis) or alone without the QuickLift™. Because there is no musculature with its concomitant contractile activity in the lateral forehead region, aging of the lateral forehead is much more aggressive than the medial forehead and this aging is primarily cutaneous in nature. The author therefore believes that lateral brow ptosis should be treated with a lateral subcutaneous lift rather than a more dangerous subgaleal or subperiosteal approach. When a lateral cutaneous browlift is not performed with the QuickLift™ for indicated patients, the results have also been very gratifying to the patient and physician. In this era of deep-plane forehead undermining with its concomitant morbidity and complication, the concept of subcutaneous forehead lift is introduced that is combined with the QuickLift™. This combined approach has created consistently excellent results while being safe, reproducible and long lasting. The QuickLift™ offers a modification of the S-lift that gives results that are comparable to an extensive facelift without the downtime and morbidity.
References
1. Saylan Z: The S-lift for facial rejuvenation, Int J Cosm Surg 1999;7(1):18-23
2. Brandy DA: The QuickLift: A Modification of the S-lift. Cosm Derm 2004;17:251-360
3. Brandy DA: The Quicklift™: Featuring an Encircling Double Purse-String Plication Technique with Blunt Neck/Jowl Undermining for Tightening of the Sagging SMAS, Platysma and Skin. Am J Cosm Surg 2005;22(4):223-232
4. McKinney P, Mossie RD, Zukowski M: Criteria for the Forehead Lift. Aesth Plast Surg 1991;15(2):141-147
5. Ullmann Y, Levy Y: In favor of the subcutaneous forehead lift using the anterior hairline incision. Aesth Plast Surg 1998;22(5):332-337
6. Vogel JE, Hoopes JE: The subcutaneous forehead lift with anterior hairline incision. Ann Plast Surg 1992;28(3):257-265
7. Ullmann Y, Levy Y: Superextended facelift: our experience with 3,580 patients. Ann Plast Surg 2004;52(1):8-14
8. Friedland JA, Jacobsen WM, TerKonda S: Safety and efficacy of combined upper blepharoplasties and open coronal browlift. A consecutive series of 600 patients. Aesthet Plast Surg 1996;20(6):453-462
9. Vasconez LO, Core GB, Gamboa-Babadilla M, Guzman G, Askern C, Yamamoto Y: Endoscopic techniques in coronal brow lifting. Plast Reconstr Surg 1994;94(6):788-793
10. Toledo LS: Video-endoscopic facelift. Aesth Plast Surg 1994;18(2):149-152
11. Ramirez OM: The anchor subperiosteal forehead lift. Plast Reconstr Surg 1995;95(6):993-1003
12. Ramirez OM, Pozner JM: Subperiosteal minimally invasive laser endoscopic rhytidectomy: The SMILE facelift. Aesth Plast Surg 1996;20(6):463-470
13. Toranto IR: The subperiosteal forehead lift. Clin Plast Surg 1992;19(2):477-485
14. Connell B: Brow ptosis. Local resections. 3rd Internatonal Symposium on Plastic and Reconstructive Surgery of the Eye and Adnexa. Williams and Wilkins: Baltimore 1982:338 380 Simplified